Monday 29 February 2016

Home Workout Just 30 Minutes to Slim

yeah! Turn your home into your gym, without buying expensive equipment

Try these exercises three times a week, and you'll see results in less than a month. Just remember to start with a 4 to 5-minute warm-up!

What you'll need:
A small ball, about the size of a soccer ball
A chair on wheels
A furniture-free area
A bath towel
Water
Your favorite music

Ab Twist, Starting Position

1. Sit on the floor (place a towel underneath you for comfort), feet shoulder-width apart, toes up, so that you are resting on your heels. Holding the ball with both hands, extend your arms in front of you.
Great for: Abdominals, glutes, hamstrings; Number of reps: 12; Time: 3 minutes

Ab Twist, The Move


2. Slowly lie back, tucking in and tightening your abdominal at all times. Stop halfway to the floor and twist to the left, reaching toward the floor with the ball. Hold for a beat, then slowly twist over to the right side. Breathe normally and concentrate on contracting your abdominal muscles.
Wall Squat, The Move
Lower your body for five counts, until your hamstrings (the backs of your thighs) are parallel to the floor. Hold, then squeeze your gluts (your rear end) and press back up for five counts. Keep the ball between your back and the wall throughout the exercise.

Back Pull, Starting Position
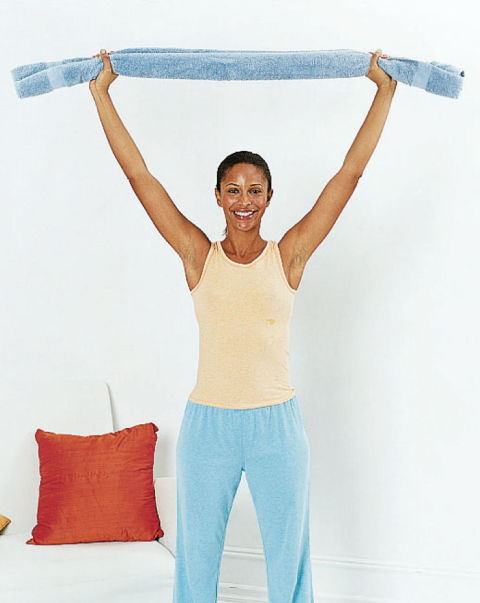
 Roll your towel lengthwise. Grasping an end in either hand, raise the towel over your head, arms extended.
Great for: Back muscles; Number of reps: 12; Time: 2 minutes

Push-Up, Starting Position

1. Fold your towel into a small square and place it under your knees for support. Kneeling on the towel, walk your hands forward until your torso is at a 45-degree incline. Hands should be slightly wider than shoulder-width apart, with your fingers spread.
Great for: Chest, arms; Number of reps: 12; Time: 2 minutes

Push-Up, The Move

2. Tuck your abdominals and inhale as you lower yourself (keep your torso two inches off the floor). Hold, then squeeze your chest muscles as you press up to the starting position.
Before moving on to the next exercise, boost your mood and burn some calories with a four-minute dance break. Put on your favorite dance CD or tape and cut loose for the next several minutes. C'mon, have fun! Not only will you burn calories, but you'll release any stress that could be causing you to overeat. Dance through one song; if you're motivated, what the heck — go for two! Then drink more water.

Related Topics.


Baked Paleo Chicken Tenders with Honey Mustard Dipping Sauce


You will love these homemade and healthy Easy Baked Paleo Chicken Tenders. Their breading is flavorful and they are so easy to make; there’s no frying involved. You just dredge them in the breading and throw them in the oven to bake. They never get really crisp, but everyone will gobble 
them up. Leftovers never stay around for long.


 Easy Baked Paleo Chicken Tenders
 4-6 servings
2 pounds chicken tenderloins
1 cup blanched almond flour (use Honeyville)
1 tablespoon flax meal
1 teaspoon paprika
1/2 teaspoon sea salt
1/2 teaspoon dried parsley
1/4 teaspoon poultry seasoning
ground black pepper to taste
2 eggs
olive oil, in a sprayer 
Preheat oven to 425 degrees (F) and line 2 large baking sheets with parchment paper.
  1. In a pie plate or another shallow wide bowl, mix together the almond flour, flax meal, paprika, garlic powder, sea salt, parsley, poultry seasoning, and ground black pepper.
  2. In another small mixing bowl, lightly beat the eggs.
  3. Blot the excess moisture off from the chicken tenders with paper towels and then dip them in the egg. Make sure the tenderloins are thoroughly coated in the egg mixture and then dredge them in the almond flour breading, pressing to adhere.
  4. Divide the breaded chicken tenders up between the 2 baking sheets and lightly spray with olive oil. Place in the oven and bake for 8-9 minutes. Flip the tenders over, lightly spray again with olive oil and bake for another 8-9 minutes, or until the internal temperature reaches 180 degrees (F).
  5. Transfer the chicken tenders to a platter and serve immediately, or at room temperature.
Recipe Notes:
These chicken tenders never become really crisp, but with the tasty breading, they quickly will become a family favorite!
Honey Mustard Dipping SauceYields 5 tablespoons
3 tablespoons runny honey
2 tablespoons Dijon mustard (I use Annie’s Naturals)
  1. In a small mixing bowl, whisk together the honey and Dijon. Serve immediately or place in the refrigerator for later use.
Megan’s Recipe Notes:
This dipping sauce is sweet; a little of it goes a long way. If it’s too sweet for your taste, try adding a tablespoon of mayonnaise to tone it down. 
And if Honey Mustard isn’t your thing, try ketchup or Homemade Ranch Dressing.
More Recipes at EveryThingIsOnaPage


Saturday 27 February 2016

10 Easy And Simple Mehndi Designs That You Can Do By Yourself


Mehndi is actually a kind of a natural dye made from the leaves and stem of the Henna tree. It is being used now as a natural dyeing agent and the art of mehndi has now spread all over the world. In western countries, mehndi is being used as a temporary tattoo too. It has specially gained a great deal of popularity in the temporary tattoo industry.
We are usually quite accustomed to seeing lavish and intricate mehendi designs during weddings. But there are also some very simple mehendi designs that look chic and beautiful and can be done for any kind of occasion. These designs require very less time and are usually simple and sweet ones that add a hint of colour to the hands but do not clutter the hands or give an over-decked look.

Here We Have Shared 10 Such Simple mehndi Designs That You Can Try With Ease:

1. Here is a very beautiful yet very simple mehandi design for the hands. The design is mainly done on the thumb and the index finger. It is quite simple but still can be easily done for any occasion to draw attention to your hands. Great if you are attending an engagement ceremony or the sangeet of a friend’s friend!

2. Here is an example of an easy mehndi design for hands where you can apply the mehendi on any one finger. On occasions where the attention will be on your hands or fingers – like an engagement or on your wedding day, you may use this type of design for your finger. This is specially applicable for women who don’t like heavy mehendi designs. It will look very really pretty if you do this on the ring finger.
3. We just loved this design as well as the matching nail art on the feet. The design is very simple, yet looks lovely. The use of the red mehndi gives a distinct bridal feel to the look and can be donned by anyone. It will suit most brides and the added accessories like toe rings will make it even more beautiful.
4. Love mehndi but do not want to apply lavish designs on your feet? Try this very simple and small design which is very easy to do. This will not interfere with your style and will blend in quite easily. This is for those who love small and hassle-free designs.
5. If you love floral patterns and also love using mehndi on your feet, try this style. This sweet and simple mehendi design can be done by anyone for any occasion. The use of mehndi makes the feet more prominent and this will also look great for office goers who love small designs on their feet.
6. Do you love applying henna? Try this simple pattern which is very easy to do. And this will look great on everybody’s hands; be it your daughter’s or your own. You can make additions to this design and make it into a full-fledged design one as well.
7. If you are new to mehndi application, then you may like to settle for one of the simplest mehndi designs initially. Behold! We have the perfect design for you! This design will flatter anyone, irrespective of their age. It will also look good on brides and on the occasion of their engagement too. The designs are not cluttered and are simple enough to be tried at home.
8. Recently there has been a new trend in mehendi, and it is the increased use of glitter and stones. Using glitter and stones looks good as sometimes mehndi can become boring with the same old colours and variations. Glitters and stones give you ample choice and you can easily settle for any colour of your choice! Glitter is applied over mehndi and the beads & stones are placed according to the design. The colours used can be changed or manipulated according to your outfit. This specially looks very attractive on the contemporary bride.
In this design we see white stones and blue stones being used, which make this simple mehndi design look absolutely gorgeous.

9. This design is quite different from the usual mehndi styles we are accustomed to seeing. The design is predominantly simple, yet it is unique. Perfect for a modern woman, who likes to mix trendy with traditional.

10. This is another one of the simple mehendi designs which is suitable for beginners. The design is great for any occasion. The unusual patterns on the fingers make this design quite unique. It has the predominant use of geometric shapes and dots, which is quite easy to do – even for beginners.


Related Post

Friday 26 February 2016

Flourless Brownies (Sugar-Free, Low Carb)


These delightful flourless brownies Sugar free can satisfy your chocolate craving with only 3 grams of carbs per serving.

Ingredients
  • 2 oz unsweetened chocolate squares
  • 1 cup unsalted butter
  • 1 1/2 cups Splenda
  • 1 tbsp vanilla
  • 4 lg eggs
  • 4 lg egg yolks
  • 6 tbsp cocoa powder
Directions
  1. Preheat oven to 350°F
  2. Melt chocolate and butter over very low heat.
  3. Let cool for a 10 minutes.
  4. Beat eggs until light.
  5. Gradually beat in Splenda until fluffy.
  6. slowly drizzle chocolate mixture into egg mixture, beating constantly.
  7. (Mixture will get very thick) Beat in sifted Cocoa until smooth.
  8. Spread batter into a GREASED 12x16 jelly roll pan.
  9. Bake for 50 minutes, or until top is puffed and cracked and tester comes Out with MOIST crumbs attached.
  10. Cool for 1 hour.
  11. Cut into 2 inch squares.


Related Recipes :

10 Simple Tips To Reduce Lower Belly Fat

Tummy fat is not a only annoying, but it is also one of the most difficult forms of fats to get rid of. It forms between the organs, deep within the abdominal cavity, triggering chronic inflammation and increasing the risk of diabetes and heart diseases. Lower belly fat is mainly caused due to sedentary lifestyle and consumption of high fat and sugary foods. Genetics, structure and age also determine the pattern of fat accumulation in the body.

Losing lower belly fat is a little difficult, but not impossible. The right diet plan combined with exercises may help to lose the stubborn lower body fat.

How to Reduce Lower Belly Fat?

Here Are 10 Tips Which You Can Follow To Reduce Lower Belly Fat.

1. Reduce Your Calorie Intake:

To get rid of the lower belly fat, keep the calories in a healthy range and avoid foods that are high in saturated fats. Avoid eating junk and include high fiber foods in your diet to keep your metabolism levels high.

2. Green Tea:

Green tea is an excellent beverage to reduce lower belly. It contains a compound called catechin, which boosts the metabolism. Several studies have concluded that, people who drank 2 cups of green tea on a daily basis, lost almost 16 times more visceral fat than those who did not.

3. Interval Training:

Interval training is the most effective and best way to reduce lower belly fat. Interval training alternates between high and low intensity Cardio, which help to burn more calories. You can intersperse small episodes of sprinting in between your walking sessions.

4. Stress:

Stress can cause an increase in cortisol, a hormone that encourages the body to store excess fat in the lower abdomen. It can get worse if combined with bad dieting. To keep the cortisol levels stable, choose low glycemic index foods like lentils, chickpeas and beans.


5. Water:

Drink plenty of water throughout the day to speed up the metabolism and flush out toxins from the body. Water keeps you full for a longer period of time. Drink a glass of water before the meals to curb your appetite. Water will also keep you invigorated and will reduce your craving for sugary beverages.

6. Diet:

The best way to reduce lower belly fat is by following a balanced diet. The diet should include low calorie fruits, vegetables and whole grains. You also need to reduce the sodium intake to minimize water retention. Limit your intake of sugar and high fat foods. Avoid consuming excess sugar as it is the main cause of lower belly fat. Excess sugar raises the insulin level in the body, causing energy to be stored in the fat cells.

7. Say No To Alcohol:

Limit your alcohol consumption. Alcohol contains empty calories and fat, which accumulate around the waist, giving you a bulging tummy. Hence, think twice before grabbing a drink if you want to lose weight.

8. Sleep:

Getting an 8 hour sleep is one of the best things you can do to reduce lower belly fat. Not getting proper sleep releases a hormone called ghrelin, which triggers a craving for sugar and other fat building foods. Cortisol levels can increase due to lack of sleep, leading to the accumulation of belly fat. A sound sleep relieves stress and refreshes both mind and body.

9. Exercise:

A study has found that people who do moderate cardio everyday can reduce lower belly fat by almost 20%. Cardiovascular exercises speed up the metabolism and burn the calories to help you lose weight. This includes jogging, walking, hiking and swimming. You can also get rid of lower abdominal fat by combining resistance training with cardiovascular or aerobic exercises. This will help you to build lean muscles and improve metabolism in the long run.

10. Do not Skip Meals:

The best way to speed up the metabolism is by eating regularly in small portions. Instead of consuming 3 large meals, eat 6 small meals. Rather than rushing through the meals eat slowly and enjoy each bite. This way you will be less likely to eat more than you need.
Above everything, you should stay focused, dedicated and motivated in anything you do. Feel free to share any of your valuable please comments with us.
Thanks
Related Topics,

Facebook Reaction Feature Now Available Globally

Facebook Reaction
facebook officially launch reaction Emotion the new Like button with more ways to express yourself
Not every moment you want to share is happy. Sometimes you want to share something sad or frustrating. Facebook community has been asking for a dislike button for years, but not because people want to tell friends they don't like their posts. People wanted to express empathy and make it comfortable to share a wider range of emotions. Mark Zuckerberg
Every day, people come to Facebook to discover what’s happening in their world and around the world, and to share all kinds of things, whether that’s updates that are happy, sad, funny or thought-provoking. News Feed is the central way you can get updates about your friends, family and anything else that matters to you, and the central place to have conversations with the people you care about. We’ve been listening to people and know that there should be more ways to easily and quickly express how something you see in News Feed makes you feel. That’s why today we are launching Reactions, an extension of the Like button, to give you more ways to share your reaction to a post in a quick and easy way.
To add a reaction, hold down the Like button on mobile or hover over the Like button on desktop to see the reaction image options, then tap either Like, Love, Haha, Wow, Sad or Angry.
The result is Reactions, which allow you to express love, laughter, surprise, sadness or anger.
Love is the most popular reaction so far, which feels about right to me!

Thursday 25 February 2016

Reduce Flabby Stomach Fats With One Tablespoon of This Homemade Syrup


We all love the taste of syrup, especially in the morning with pancakes and bacon, but unfortunately, it all goes down in the stomach and turns into fat. Lucky for you, you can change the recipe into something that will help you lose the excess fat. Exciting, is not it? 

To make this homemade syrup, you will need: 125grm. horseradish, 3 lemons and 3 spoonfuls of honey . note: You can increase the quantities to suit yourself. 

Start by blending the horseradish into a blender until it forms a nice paste and gradually add the lemon and the honey, The honey will give you the sweetness and the syrupy structure, and the horseradish adds the sharp taste to it.


You will only need 2 (two) table spoons daily, whether in one meal, or one in the morning and one in the evening for three weeks before taking a few days break.

This mixture contains sucrose and fructose that will boost your energy and the honey will supply you with big amount of energy, while the horseradish will provide you with vitamin C, phosphorous, vitamin B6, potassium, iron, magnesium, calcium, vitamins B1 and Vitamins B2 and together with the lemon juice it will speed up your metabolism, thus accelerate the fat burning.


Related Topics,

How I Lost 31 Pounds Without Exercise In 4 Weeks With This Powerful New Slimming Formula


This weight loss drink, a mixture of Nescafe and Coconut oil became enormously popular after a businessman Dave Asprey shared it to the public few months ago:

Try this just once, with at least 2 Tbs of butter, and have nothing else for breakfast. You will experience one of the best mornings of your life, with boundless energy and focus. It’s amazing.

This creamy drink of Nescafe and coconut is so full of calories that can replace a whole meal, and when you drink the entire energetic bomb you won’t be hungry for the next three hours for sure!

This wonderful drink’s secret lies in the high concentration of fat it contains so besides not feeling hungry, you will be full of energy since the fat helps the effects of caffeine.

There are a lot of different versions of this popular coffee, but we offer you the original one:

What you need:

– 1 teaspoon of Nescafe
– ½ tablespoon cocoa
– 1 dl almond milk

– 1 teaspoon coconut oil
– 1 dl boiling hot water


Preparation:

Take your favorite cup, pour the coffee and the cocoa and add the boiling water. Beat this mixture with a coffee machine and then add the warm almond milk. At the end add teaspoon of coconut oil.

This coffee will become such a wonderful habit and will make you lose a lot of pounds by the summer.


4 Surprising Ways Drinking Black Tea Does The Body Good


Black tea is one of the oldest beverages in the world, and over the past few decades it has only become more popular.
Many individuals turn to black tea as an alternative to coffee, while others drink it after meals to aid digestion.
However you take it, though, you can be sure that black tea has multiple health benefits – some of which may surprise you!

From preventing cardiovascular disease to inhibiting the spread of cancer, black tea is certainly more than just a tasty drink.

Here’s a quick look at some of the therapeutic functions of black tea:

1. Anti-Cancer Agent
Polyphenols in black tea – as well as in green tea – serve to regulate cancer cell growth, survival, and metastasis, effectively inhibiting the growth and spread of cancerous cells in the body.
A 2006 paper, published in the journal Anticancer Agents in Medical Chemistry, explored the relationship between black tea and the decreased frequency of cancer development, concluding that there is a probable connection between these factors(1).

2. Prevents Cardiovascular Disease
A study published in the Cochrane Database of Systematic Reviews examined the connection between black tea and the prevention of cardiovascular disease. Although they were working with limited evidence, the trials did suggest that black tea had “favourable effects” on risk factors for cardiovascular disease(2).

While more research remains to be done, the outcome of this study was significant in indicating that black tea can work to prevent cardiovascular disease.

3. Reduces Your Risk Of Heart Attacks
Black tea consumption has been found to lower levels of LDL cholesterol in hypercholesterolemic adults, according to a 2003 study published in the Journal of Nutrition(3).

By lowering your levels of LDL cholesterol, black tea can significantly reduce your risk of heart disease and cardiac events, especially when paired with a moderately low-fat diet.

4. Chock Full of Antioxidants
Black tea is an especially effective antioxidant beverage, due in particular to the polyphenols – such as theaflavins and thearubigins – contained in the tea(4). Antioxidants inhibit the generation of free radicals, slowing the ageing process and reducing your risk of developing cancer.

Now that you know the health benefits of black tea, you can enjoy it guilt-free; it’s better for you than soda, and easy to prepare. Simply boil a kettle full of water and pour it over black tea, either loose or in a tea bag, and let it steep for five to ten minutes, depending on how strong you like your tea. Black tea can be sweetened with honey for those who prefer a sweeter, milder tea.